

This is the third post in the Blog Post series, Microsoft 365 Fiscal Year Retention, and its purpose is to demonstrate one of the ways you can implement Fiscal Year retention inside Microsoft 365.
The retention requirement may read something like this… “Retain all Financial reports for 7 years past the close of the Fiscal Year they relate to and then destroy/put thru a disposition review”.
There are several ways to accomplish this other than manually applying a retention label to a document. Remember… end-users have other work to get done (and aren’t Records Managers) and we don’t want to rely on them to have to remember to apply a retention label to a document at the end of each Fiscal Year. Instead, let’s look at how this can be automated.
Each of the options in this series has differing levels of automation, control, complexity, pros, and cons. I’ll walk thru each of them in separate posts and will update the links here as they’re published:
- OPTION 1: Microsoft 365 Fiscal Year Retention | Default Folder
- OPTION 2: Microsoft 365 Fiscal Year Retention | Event-based Library Default
- OPTION 3: Microsoft 365 Fiscal Year Retention | Microsoft Syntex (this post)
- OPTION 4: Microsoft 365 Fiscal Year Retention | Event-based Auto-Apply
Advanced compliance capabilities are required for each of the options in this series for “any user benefiting from the service”. This means anyone with contribute access or above to the document library where Fiscal Year retention is being applied will require the license providing the capability.
As of May 2021, one of these is required for any of these options: Microsoft 365 E5/A5/G5, Microsoft 365 E5/A5/G5 Compliance, Microsoft 365 E5/A5/G5 Information Protection and Governance, Office 365 E5/A5. Refer to the Security & Compliance Licensing Guidance for up-to-date detail.
FACT: Automation = Advanced licensing = Less onus on the end-user
… don’t shoot the messenger.
Steps for Fiscal Year Retention | Microsoft Syntex
This post will demonstrate how you can use an unstructured document processing model to extract the Fiscal Year from an unstructured document, apply an event-based retention label to the document, and then trigger the event at the end of the Fiscal Year to start retention.
Please refer to a previous post of mine where I show how to build a Document Understanding (DU) model (now called an Unstructured document processing model) for a Statement of Work (SOW), SharePoint Syntex. First Steps with Intelligent Content Types and Compliance. Once you’ve reviewed that post, come on back… I’ll be waiting. 🙂
In this post, I’ll add a custom column entity extractor for Fiscal Year to the model for the SOW and automatically apply an event-based retention label.
This option involves 8 steps:
- Create event-based retention label
- Associate the retention label to the Syntex Model
- Add term synonyms for each Fiscal Year term for months within the Fiscal year
- Add a Fiscal Year entity extractor to the Syntex Model
- Train the Syntex model with sample documents
- Publish the Syntex model to all libraries across your tenant where SOWs will be stored
- Validate the search query for the event
- At Fiscal Year end… trigger the event
Let’s dig in…
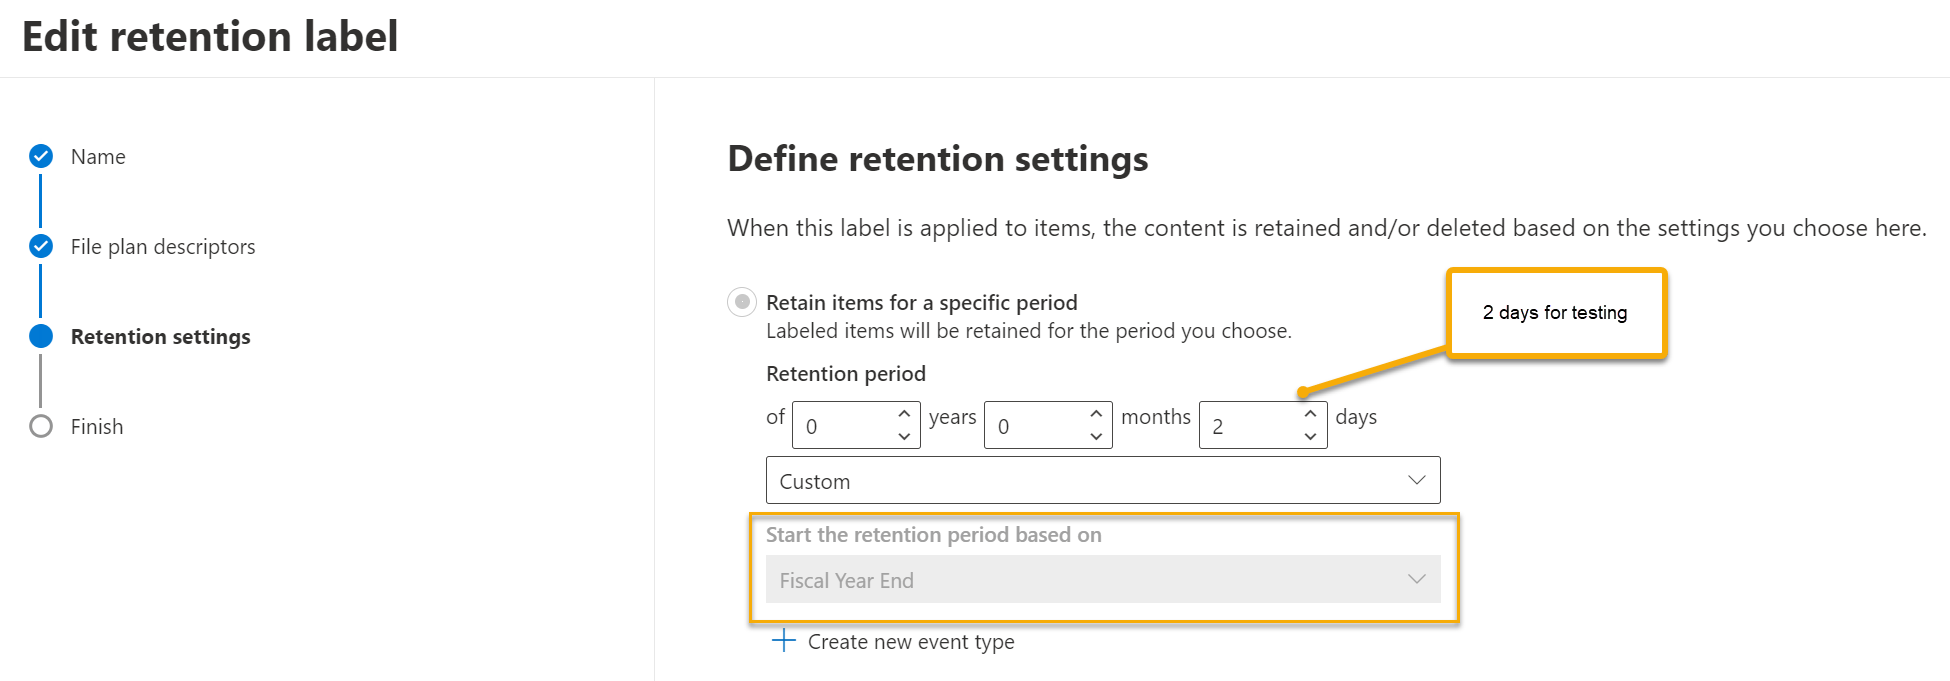
Step 1 | Create Event-based Retention Label
For this test, I’ll create a new event-based retention label called FY Event Label. I’ll associate it with an event type, Fiscal Year End. This event type has been previously defined and is a “container” for all labels that will be associated to the event.
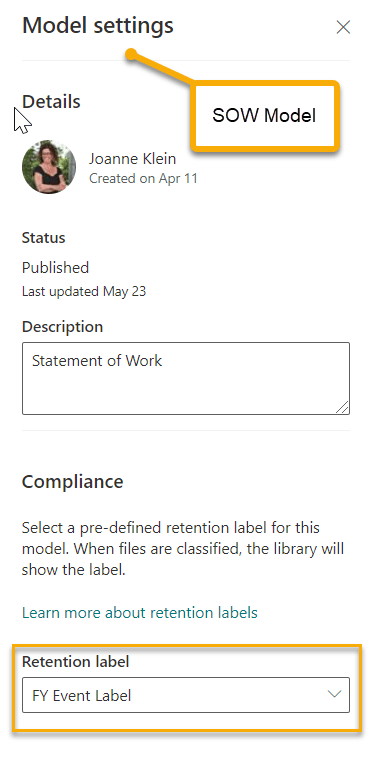
Step 2 | Associate Retention Label to Syntex Model
Once the retention label has been configured, you can associate it to the Syntex Model. You don’t have to publish the retention label to the Content Center to see it in the Retention label dropdown list.
Step 3 | Add Term Synonyms
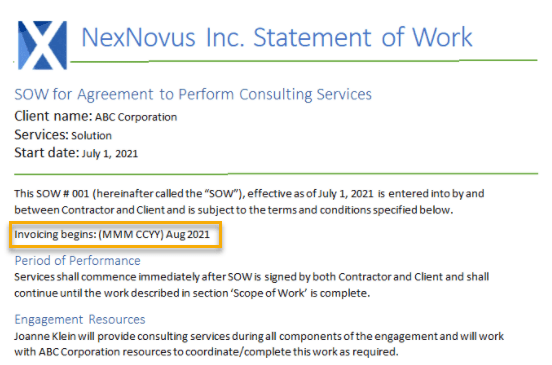
On the SOW documents I’m building the Syntex model for in this tenant, there is a line indicating when invoicing will start. (image)
All SOWs where invoicing starts in a month of a Fiscal Year will require the retention period to begin after the Fiscal Year they relate to is over. I use term synonyms to accomplish this.
In the tenant term store, I’ll add a term set for Fiscal Year. For each Fiscal Year, I’ll add synonyms for every month in the year. The image below shows all Fiscal Months in the 2022-23 Fiscal Year added as Term synonyms (yellow rectangle):

A Microsoft Syntex unstructured document processing model will detect the term synonyms in the content of the document and automatically assign the parent term, Fiscal Year in this case, to the SharePoint column. For example, if ‘Sep 2022’ was detected in the document, the term 2022-23 would be set on the SharePoint column. This is key to making this work.
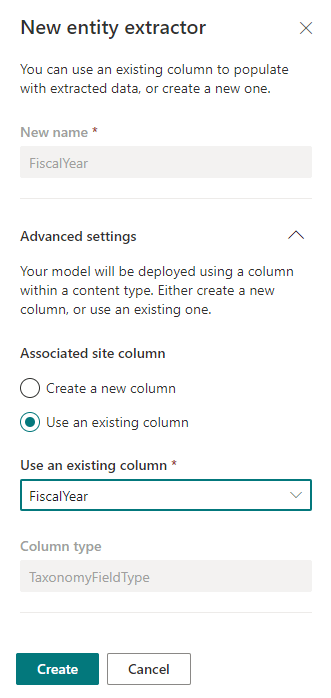
Step 4 | Create Entity Extractor for Fiscal Year
I want to extract the fiscal year from the SOW and I do this be defining an Entity Extractor for it in the SOW Syntex model. I’ve pre-created a Fiscal Year site column in the Syntex content center and I use that to build the Entity Extractor from.
Tip: you must pre-create any columns that are of a managed metadata column type (TaxonomyFieldType).
To train the model, you need at least 5 positive examples of an SOW and 1 negative example. Each of the sample SOW documents has a consistent string in it depicting the invoicing start month as follows:
Invoicing begins: (MMM CCYY)
I’ll use this to build the explanation. An explanation is like a tip to teach the Syntex model how and where to identify the entity you want to extract. You need at least 1 explanation for each entity extractor. I’ll teach the model to look for the phrase, (MMM CCYY), before the entity within the starting 80 characters of the document and then extract the value following it into the Fiscal Year.


Step 5 | Train the Syntex Model
Once the explanation is configured, the model needs to be trained to predict what the Fiscal Year column will be. The first image below shows the source document and the content within extracted by the entity extractor and the second image shows the predicted values for the Fiscal Year entity extractor. The prediction is the value that will be inserted into the SharePoint column:

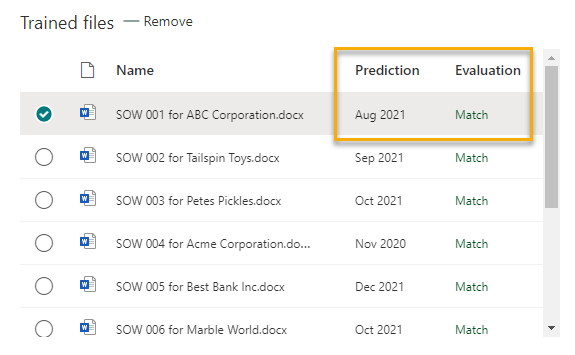
You may be thinking that the Predictions above don’t look like Fiscal Years; however, once that value is added to the column in SharePoint, it will detect it is a term synonym and will correctly apply the main term, Fiscal Year 2020-21 in this case, to the SharePoint column.
Step 6 | Publish the Syntex Model
If you’ve got this far, you’re done the heavy lifting! Yay!! Now you need to publish the Syntex model to all libraries across the tenant that may have an SOW uploaded into it.
I have several SharePoint sites in this tenant that house SOWs. Below I’m showing a SharePoint site called Finance Team which I’ve published the Syntex model to. I’ve uploaded 9 SOWs and 2 documents that are NOT SOWs to see what happens when the Syntex Model runs against them.
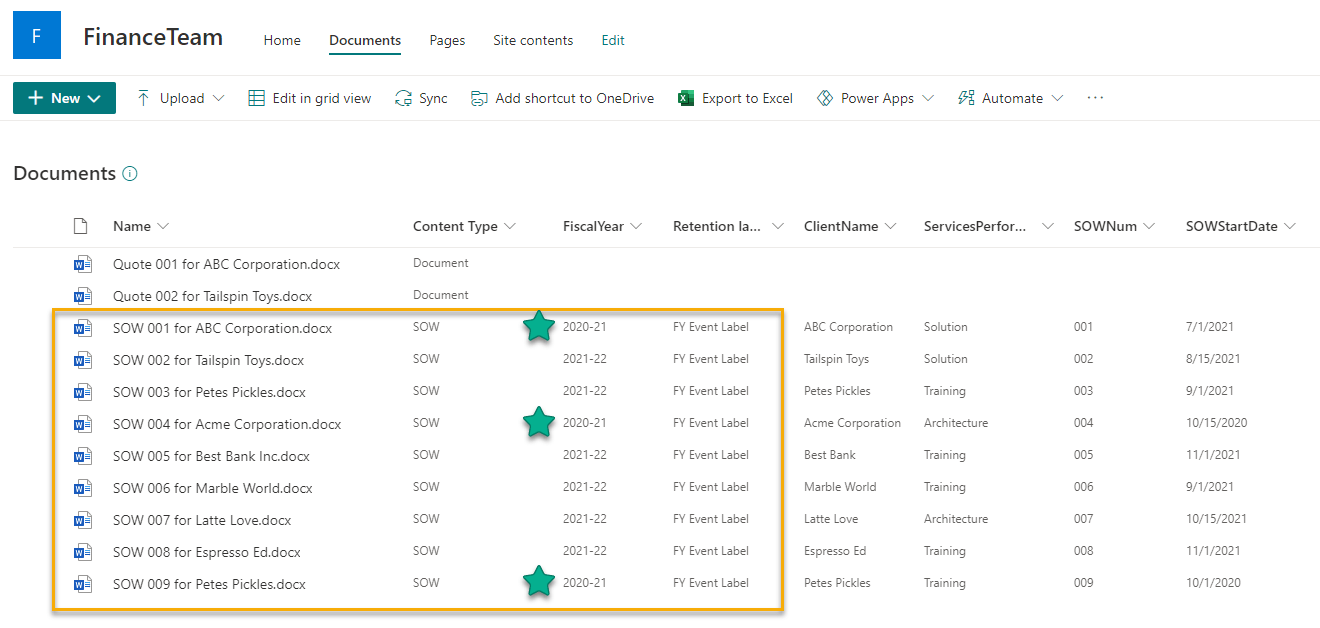
You can see all the metadata that was successfully extracted out of the documents, including the Fiscal Year. All columns extracted had a corresponding entity extractor defined in the Syntex Model. You’ll also notice the retention label, FY Event Label, has been successfully applied since it is associated to the SOW Syntex model.
I’ve placed a green star beside the 3 for FY 2020-21. This will be the year I’ll trigger the Fiscal Year end retention event for.
Step 7 | Validate the Search Query
The power of event-based retention comes in starting retention on content across your entire tenant. In this tenant, I have SOWs stored in several sites, each with a Fiscal Year assigned to it along with the retention label, FY Event Label.
I want to determine how many items will be associated to the event. Using the same managed property configured in the last post, Microsoft 365 Fiscal Year Retention | Event-based Library Default, I run a search for the Fiscal Year and Retention label against all sites (from within the SharePoint app) with this query:
RefinableString108:”2020-21″ AND ComplianceTag:”FY Event Label”
The results span across 2 SharePoint sites (“The Works” and “Finance Team”) and returns 6 documents:

Step 8 | Trigger the Fiscal Yearend Event
For this post, I’m manually configuring the event, however this can also be automated as described in my previous post. I’ll reference the retention label, FY Event Label, and use the same managed property mapping query as was used in my previous posts.

Several days later (controlled by a back-end process you have no control over), the event results are updated to reflect:

After the retention period is complete, the backend process will complete the action you have configured on the event-based retention label. If this included a disposition review process, it will start; otherwise the documents will be automatically deleted.
Pros
- Scalable. Once the Microsoft Syntex unstructured document processing model is configured, it can be published to any document library in your tenant. This will automatically extract the Fiscal Year metadata column and set the retention label. This will allow the annual event trigger to start the retention on the item.
Cons
- You cannot add new content with the FY and the retention label AFTER the event has been triggered. It will not get picked up if you do. You must add a new event with the same search query to pick up the new content.
- Someone has to remember to trigger the event! This can be done manually OR automatically (will incur technical debt that someone in your org will need to support)
Dependencies
- Requires SharePoint search knowledge
- Requires back-end configuration in tenant-level term store
- Requires license for Microsoft Syntex (either per user license or pay-as-you-go)
- Requires Microsoft Syntex model configuration
Closing Thoughts
The power of the Microsoft Syntex option is scale. If you have content you’re already processing with a SYntex model in many disparate sites across your tenant, this is a great option. The heavy lift is in the initial configuration; however, once that is done, each year only 2 things are required:
- ensure the new Fiscal Year term is added to the tenant-wide term store and include all of the months of the Fiscal Year as synonyms (assign a Term Set Owner to do this)
- trigger the Fiscal Year event
Thanks for reading.
-JCK
One comment