

This post walks thru an example of how to automatically apply a sensitivity label to files in SharePoint Online and OneDrive under certain conditions using an integration between Microsoft Cloud App Security (MCAS) and Azure Information Protection (AIP).
Note: To clarify, integration with AIP will leverage sensitivity labels if you have migrated your AIP labels to Sensitivity labels and published them in the Security & Compliance Center. Documentation currently refers to AIP.
Reference: How to integrate Azure Information Protection with Cloud App Security
I’m assuming if you’re reading this post, you already understand the importance of applying sensitivity labels to content across your environment. They can apply visual markings, encryption, and rights management to allow/prevent certain actions on a document (copy, print, etc.) all based on how you define sensitive information in your organization.
There are numerous ways to apply a sensitivity label ranging from manually applying one to utilizing some of the auto-apply capabilities available and coming to Office 365. Depending on the services available to you in Office 365 and whether or not an end-user has correctly labeled the content thru manual means, an additional “line of defense” may be required to automatically set it. For example, you may want to apply a certain sensitivity label under these conditions:
- anything created by the CEO
- anything created in the Board Team site’s library
- anytime a customer # is detected in a file
MCAS is a very powerful tool in the Microsoft 365 toolkit, and there are many other things you can do with it to control and govern your environment including all 3 of the scenarios above, however I’ll walk thru the third example, apply a Customer sensitivity label whenever a customer # is detected in a file, to demonstrate an excellent use-case for this powerful tool.
License requirements for this functionality:
- Microsoft Cloud App Security
- Azure Information Protection Premium P1
Setup
For purposes of this post, I assume you have a custom sensitive information type configured in your tenant to identify when a customer # is used. In this example, the custom sensitive information type is called ABC Corp Customer Number and it is identified by a match on a regular expression to match AA-##### format near a keyword of “Customer”:

I also assume you have the Customer sensitivity label defined and published to staff across your environment in a Label policy.
To integrate MCAS with AIP, you must select the Azure Information Protection option under Settings in MCAS:

In order for File Policies to inspect content in protected files across your environment, MCAS must be granted permissions to do this:

To configure a file policy, you must enable file monitoring. You can do this in Settings…Information Protection…Files


Create File Policy
In the Policies page in MCAS, create a File policy:

Lots of information to enter for a file policy, however for this example, here are the key elements:
- Policy name: Detect customer info
- Filter: match on any access level other than private:

- Inspection method: select an inspection method of Data Classification Service and select the custom sensitive information type you’ve defined for your corporate customer #, ABC Corp Customer Number:


Alerts: You can also configure alerts for files matching your filter. Whether you do this or not will depend on the governance required over the file matches. For this example, I’ll create an alert and send myself an email:

In some scenarios, it would be a great idea to build a Flow using Power Automate to possibly do some follow-up actions on any alerts.
Assign the Sensitivity Label
Now the important part… in the File policy configuration, you can specify governance actions for both OneDrive for Business and SharePoint Online when a file match is found. For this example, I’ll select both of these and automatically apply a Customer sensitivity label:


*The yellow star above indicates a potential setting you may want to enable if you also don’t want this file to be shared externally.
Seed some Customer Files
For the test, I created 5 files with customer information across several Microsoft Teams without manually applying a sensitivity label. After a few minutes, 5 files showed up matching the file policy and all files had the Customer sensitivity label applied.
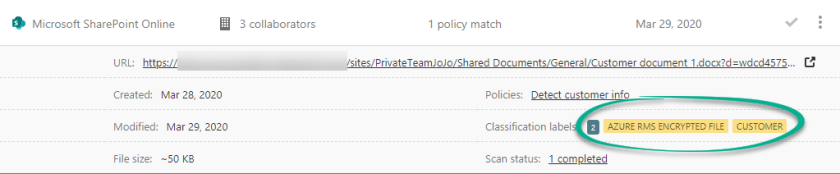
The Customer sensitivity label definition is encrypted which MCAS is aware of and applies the proper encryption with the label (shown is the file alert and the details logged for each):
Note: I had 1 file with customer information in it with a different sensitivity label and it was NOT overwritten by MCAS.
Here’s the email notification I received for each file found where it applied a sensitivity label:

Since the Customer sensitivity label was applied to the document and the rights management controls on it prevent copying, I could not take a screen-print of the document. Instead, I took a picture of the document on my laptop screen with my camera to prove the label was applied: 🙂

What about the auto-labeling capability for Sensitivity labels?
There are 3 other auto-labeling features for sensitivity labels in the Security & Compliance Center and they will also help manage content across a tenant by automatically detecting content and applying the correct sensitivity label.
Auto-labeling for Office apps: Each sensitivity label can be auto-applied or recommended based on sensitive information types right within the office apps.
Auto-labeling policies (preview): This will be able to apply a sensitivity label to a specific Exchange mailbox(es) for emails sent (in transit) or SharePoint and OneDrive site(s) content at rest based on rules defined (sensitive information types).
ML based automatic labeling (preview): This will auto-apply a sensitivity label to content at scale across your environment using machine learning classifiers. There are 6 built-in classifiers at the moment, however you can also build your own.
Over time, a combination of all of these will improve your overall coverage of sensitive data from the many ways content can come into and leave your environment.
Extra: Targeting a specific library
For the second example I had listed at the start of this post where you want to apply a sensitivity label to a specific document library in SPO, you can do that by setting the library option in the file policy. In the image below, I’m targeting the Shared Documents library in “Joanne’s Team site”:

My thoughts
Integrating MCAS capabilities with sensitivity labels takes the possibilities of what you can do with them to the next level. Even if an end-user forgets to apply a label and the auto-labeling capabilities above are either not configured or have not applied it, this can apply the label for them to accommodate your unique business scenario! The ability to have oversight on how much of your content is caught by this policy can also feed into your continuous improvement plan for securing and protecting your environment.
This post demonstrated 1 great way to improve your security and compliance posture across your Microsoft 365 environment with 2 very powerful tools coming together.
Thanks for reading.
-JCK
Credit: Photo by 500photos.com from Pexels
Hi Joanne,
tried this out but it looks like MCAS does not apply Sensitivity Labels but Azure Information Protection labels. I noticed it showing the Sensitivity Label Column and when I try to open the file with the Office Webapps. Do you have any information about this?
Greetings
Daniel
Hi Daniel, if you’ve migrated to sensitivity labels it will use them as I’ve done this in my own tenant. The MCAS feature still refers to AIP in the UI but it definitely will apply the sensitivity label. Do you see the activity getting logged in MCAS for the files?
-JCK
Hi Joanne,
many thanks for the reply 🙂
Very strange.. If It set the label with MCAS I cannot see use the webapps to view the content. Additional, when I show the column “Sensitivity” its empty.
When I set a sensitivity label manually it works as expected. The column shows the Sensitivity Label Name and Webapps can open the file. Is there something wrong on my tenant?
Was a solution ever found for this? I noticed when I have MCAS assign a label to a file it adds an Azure RMS Encrypted label on top of the selected sensitivity label. This is what I believe is preventing the file(s) from being opened in the web apps. The labels were created in the Security & Compliance Portal not the Azure Information Protection blade.
Scratch that, after relabeling a file manually via the Azure Information Protection Unified Labeling Client and MCAS they both appear to have 2 classification labels (Whatever the sensitivity label was and an additional Azure RMS encryption label) when viewing the metadata from MCAS. The only difference between the files that I am seeing is the modified by field in MS Teams shows the user who labeled the file when it was done via the AIP client and “SharePoint App” when it is done via MCAS. The AIP client labeled file can be opened in web apps whereas the MCAS labeled file returns this error:
“Sorry, Word can’t open this doucment in a browser because it’s protected by Information Rights Management (IRM). To view this document please open it in the desktop version of Microsoft Word”
Please let me know if there is anything you can think of that would cause this discrepancy when trying to apply Sensitivity labels to office files stored in SharePoint.
I found no solution for this.. but my last checked was few weeks ago. So nothing changed and still the same issue Monthomery?
HI @Montgomery,
I also test this just now and few months back , in both occasion I m also experience the same. I m using UL in SCC.
1. When I use MAC policy to apply UL to a document in SPO folder the document wont open in SPO online, I have to open it on desktop app. Also the Sensitivity column is empty.
2. But if I apply the same label manually on a document in SPO the sensitivity column display the label name and the document can open in SPO.
I have asked this question Ignite session and they said if you are using UL the document should open in SPO, but clearly its not.
Thanks.
I think you need to enable option to “Inspect Protected Files” under the specific MCAS policy.
Hi all,
I found this link that could address the issue
https://github.com/MicrosoftDocs/microsoft-365-docs/issues/922
which in turn directs to official MS Docs:
https://docs.microsoft.com/en-us/microsoft-365/compliance/sensitivity-labels-sharepoint-onedrive-files?source=docs&view=o365-worldwide#limitations
and reading carefully, we can find a specific limitation:
“If a labeled document is uploaded to SharePoint or OneDrive and the label applied encryption by using an account from a service principal name, the document can’t be opened in Office on the web. Example scenarios include Microsoft Cloud App Security and a file sent to Teams by email.”
That note could explain the issue on automatic labeling from MCAS!
No info on roadmap to guide the issue
Thank you for your thorough feedback and response Marco!! I’ll update the post to reflect and give credit to you when I get a few cycles.
-joannecklein@nexnovus.com
Very nice blog !!!!
I have one design question to confirm with you.
Let’s say a user from one tenant ( john@sender-tenant.com) protects a WORD document and authorize a user from other tenant (mike@receiver-tenant.com)
So when Mike opens WORD app , the RMS-client employed by WORD app to open the protected document will try to collect the access-token/id-token before hitting the RMS-service in the cloud.
Which tenant would be the issuer of this token ? Would it be John’s tenant (who labeled the document) or Mike’s tenant.
If it is John’s tenant (because the document is created and authorized by John) then I believe Mike must be one of the B2B/guest user of John’s tenant.
Besides, if John wants that the external parties also do MFA before opening the document, then that MFA must be configured in the conditional-policy of John’s tenant and hence Mike should be the B2B/guest user of John’s tenant.
Am I correct in my understanding ?
Thanks.
Hi Joanne,
Very useful blog !!! Want to talk about one design point.
Let’s say a user from one tenant ( john@sender-tenant.com) protects a WORD document and authorize a user from other tenant (mike@receiver-tenant.com)
So when Mike opens WORD app , the RMS-client employed by WORD app to open the protected document will try to collect the access-token/id-token before hitting the RMS-service in the cloud.
Which tenant would be the issuer of this token ? Would it be John’s tenant (who labeled the document) or Mike’s tenant.
If it is John’s tenant (because the document is created and authorized by John) then I believe Mike must be one of the B2B/guest user of John’s tenant.
Besides, if John wants that the external parties also do MFA before opening the document, then that MFA must be configured in the conditional-policy of John’s tenant and hence Mike should be the B2B/guest user of John’s tenant.
Am I correct in my understanding ?
Thanks.
Hi Chirag,
I believe you are correct. Here is an excerpt from the “secure external sharing” documentation which I believe follows the same model for RMS protected docs: “Recipients of secure external sharing who also use Microsoft 365 in their organization can sign in using their work or school account to access the document. After they have entered the one-time passcode for verification the first time, they will authenticate with their work or school account and have a guest account created in the host’s organization. IT admins can manage them like any other guest account in their directory.”
So in your example Mike would have a guest account created in John’s tenant via Azure B2B.
I’ll also verify when I get a minute.
-Joanne
Hello Joanne,
First, thank you for sharing your knowledge with us.
Reading above, I have a question rather a scenario if it is possible…
With protected label can we have a restriction created that any document with that label should be downloaded from OWA.
I understand that the option of Allow Limited – web access only for a label is a container based restriction, but is there a way to have similar for OWA?
Thank you
Hi Jyolty, do you mean to say “shouldn’t” be downloaded? Assuming so… it’s not a mailbox container setting like it is a site container setting. I think if you had a sensitivity label applied to the email and document attached with the right combination of label controls set that *might* work. I’d have to test out the combination of settings to see. 😊
-JCK
I’m interested in why all of these policies seem to boil down to identifying Sensitive Information Types. My customers are asking me for the ability to just label ALL content in a specific SharePoint SIte with a specific sensitivity label, and I’m not sure how to accomplish that with the tools we are being given.
My only thought has been to create a “sensitive info type” called “All Data” which matches everything, and use that to apply the given label. What am I missing?
Hi Bill,
The recommended approach is to protect *sensitive* data, not necessarily *all* data. Depending on the protection controls you’re planning on putting in place, protecting all data may have a (negative) collaboration impact. (i.e. are you applying rights management to everything?)
If you want to apply to “all” data, there’s no simple way to do that. The idea of inheriting a site’s sensitivity to all content within is something alot of people want and could help you out in this regard; however it doesn’t currently work that way – Microsoft is looking at options for doing this however. That may help as you can set it at the container (i.e site) level and all docs within will inherit that sensitivity. Until then, you can use MCAS and target specific locations (I’ve been told there’s limits on this though so you’ll have to look into that). I’ve never tried the SIT route you’re talking about – not sure how you’d identify “all data” using that… one thing to remember is if everything is included in the “all data” SIT, then the meaning of all of the reporting goes out the window – might be hard to focus in on a certain type of sensitive information. I haven’t spent much time thinking about this approach though. I guess I’d ask “what problem are you trying to solve?” It should come down to protecting sensitive information.
Hope this helped.
-JCK
I appreciate your response, I have been unable to get our internal Microsoft reps to be helpful with these issues. The specific problem I am trying to solve is our users have created a SharePoint site with a large number (thousands) of unlabeled documents. We want to label those documents (with a specific label we have created). Short of opening every document and applying a label, what tools do I have at my disposal?
At least with the windows unified labeling client, I can select multiple files and apply a label, however with Sharepoint no such tools exist. So right now I seem roadblocked on what ( I would consider ) a very simple and straightforward task.
Hi Bill,
This is what many people are asking for… the ability for all documents in a site to have the sensitivity label of the container applied to it. Until that happens, there’s no options other than the ones below as far as I know:
Sensitivity label Service-side auto-apply targets a sensitive info type and not “everything in a site” so sounds like that won’t work for you.
I’m lost in this thread so I assume MCAS isn’t working for you. I know it does have the ability to target a SP library so that’s unfortunate. However I think it will only work for when Docs are uploaded/changed anyway. (Won’t scan existing)
The MIP SDK is another option I guess if you want to write some code.
Possibly a tool like Sharegate *might* do it? I’ve used that tool a ton for SP migrations however never looked into whether it works with sensitivity labels. If it did, it might be a temporary stopgap until/if the site sensitivity inheritance thing happens.
That’s all I’ve got. You might want to try asking this question in the S&C Tech Community for a broader reach if you haven’t already. Let me know if you don’t get a response from there.
Also… what problem are you trying to solve with the sensitivity label on these documents? That may trigger something else in my mind.
-Joanne
Hi Joanne,
I have the same use case like Bill. I use MCAS for auto labeling because I find no option to auto label all files with Auto-Labeling. I created a information sensitivity type with Regex of “.” that would match all files but this seams to not be working. The simulation only found 26 files in a >3k file library with PDF and office files.
MCAS scans the SPO library and works great so far also for documents that are already in the library unlabeled. The only limitation is 100 labels per day which I’m going to rise with a Microsoft ticket.
Do you see a way with Regex filters and Auto-Labeling?
Hi, thanks for the update! I haven’t tested a regex that would accomplish what you want. In theory, you’d think it would work, but maybe there’s some throttling in place to prevent it… I really can’t speak to that. Do you belong to the MIP Microsoft Team for preview stuff? The product team is in there and they would be a better resource than me on this.
-Joanne