

I officially signed up for SharePoint Syntex, assigned the license to my own account, and have started to dig in to what the world of AI models will mean for customers looking to intelligently apply information governance and retention at scale across their tenant workloads.

There are many features included in SharePoint Syntex and it will take awhile to fully understand it all.


My technology focus is on security, compliance, and ways it can be automated – this is one of the key pieces of functionality SharePoint Syntex will provide. At the heart of being able to apply this at scale, a new site template called the Content Center is now available to us. Let’s start by provisioning one of those… a default content center is created when I select Automate content understanding and Get started in the Microsoft 365 Admin Center under Setup… Files and Content.
Although not required, you can have more than 1 Content Center in your tenant. This would be a way of separating our your AI Models across different administrators/Business Units in your organization.
To walk-thru a specific use-case in this post, I’m going to build a Document Understanding (DU) model around Statements of Work (SOW) for my own company – fortunately something I’ve been creating a lot of lately!! 🙂
I store SOWs across disparate sites in my tenant, (each one in a different Modern Team site relating to the client). I would like to be able to apply a SOW DU model to any library across my tenant to allow me to protect and retain those documents in a targeted and specific way.
There are 2 types of AI models within SharePoint Syntex:
Form Processing Models
This will allow end-users to train a form processing model and apply it to a document library. This is done for semi-structured documents – a great example of this is a customer form that follows a prescribed format. In my setup, I’ve ensured all document libraries across the tenant will show the option to create a form processing model.
Note: you will require AI builder credits for forms processing.
Document Understanding Models – THIS POST!
These models are based on Language Understanding models in Azure Cognitive Services. Prior to building one of these, you must create a content center to house them in. These models are for unstructured content and is what my SOW example will fall into. In my tenant, I’ve created a new Content Center called Syntex Content Center.

The SharePoint Syntex site will appear in the list of SharePoint sites in the SharePoint Admin Center and permissions can be administered from there.
Here’s what my brand new, shiny Content Center looks like:
Follow along as I create my first Document Understanding (DU) model for my SOWs:
Previously defined:
An SOW Content Type has been created in the Content Type Gallery in my tenant called Statement of Work. I’ve published the content type to all sites. (To manage all collaboration with my customers, I create a new Modern Team site for each one and join it to my Customer Hub. Therefore, all SOWs will exist somewhere within the Customer Hub architecture and I will publish the DU model across libraries in those sites)
It took about 30 minutes before I could see the Statement of Work content type in the SharePoint Syntex Content Center:

NOTE: you do not have to create your content type ahead of time as I have done here. You can create the DU model from scratch which will automatically create a content type of the same name.
Step 1: Create a model
Provide a name and associate a content type to your model. You can create a new content type in-the-moment or use a previously created one. In this post, I’ll use the Statement of Work custom content type published from the Content Type gallery from the previous step to create a new DU model, StatementOfWork.
[Update June 18, 2021] You can also associate a retention label and a sensitivity label to your model. Both labels must be previously defined from the Compliance Center before you will see them in the drop down lists to select from. Work with your Compliance teams to determine the types of protection and retention controls that should be applied to content associated to your model and then set the corresponding sensitivity and retention labels to suit.
Once created, the model has a .classifier extension: StatementOfWork.classifier and is stored in the Models document library on the Content Center. You can, of course, have many models defined in the Content Center.
Add Example Files
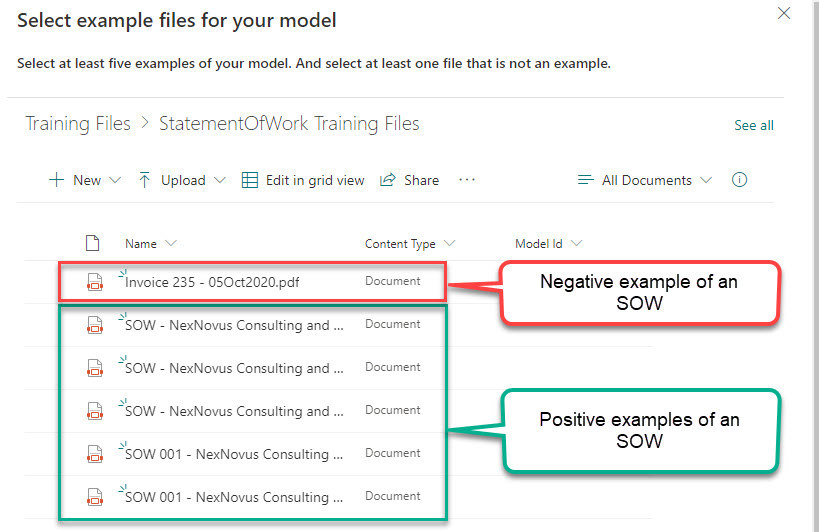
Step 2: Add SOW example files (5 positive examples, 1 negative example)
In the Training Files library, I created a folder to house the example files specific for the StatementOfWork DU Model. I then uploaded 5 positive examples and 1 negative example into the folder, selected them, and added them to my model:
Classify files and run training
Step 3: Train the model to identify the files by labeling them and adding an explanation. This is adding some intelligence to your content type!
Click Train classifier…
This step will go thru each of the 6 files individually and ask if the file is an example of a Statement of Work.

Once enough files have been labeled to satisfy the model, a green toolbar message will appear advising you of this and that you can proceed to the Train step.

Step 4: Add explanations for your example files. Explanations help the model distinguish the SOW from other types of documents.

Once you add your explanations, you can train your files by selecting Train Model.

Try uploading other examples of both positive and negative files to see how smart your model is… it will tell you if it considers it a match or a mismatch.
Create and Train Extractors (Optional)
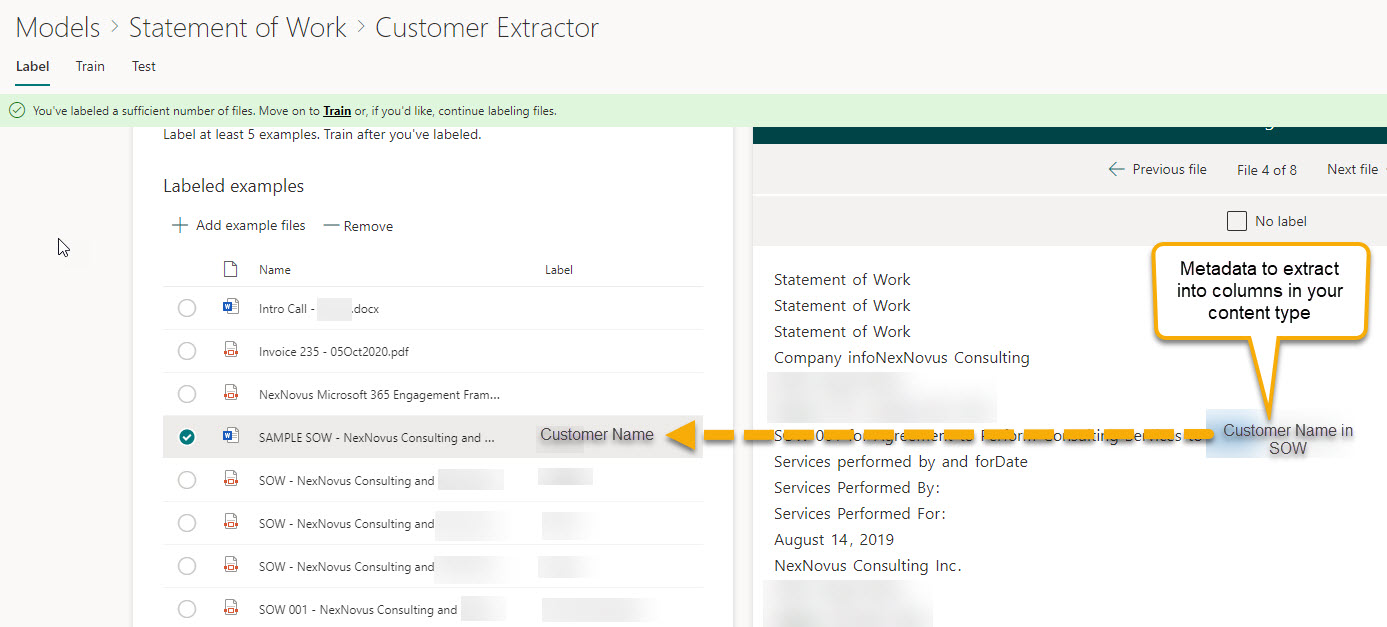
Step 5: You may want to extract words, phrases, and/or numbers from the example files. This will equate to library columns where you’ve applied the model. I have 2 site columns in the Statement of Work content type (Customer and SOW Effective date) and definitely want to pull these values from the SOW documents.
Add extractors – because I have associated my custom content type, Statement of Work, with this DU Model, I can add an extractor for each of the 2 site columns to have them automatically populated in document libraries when I apply this DU Model:

I created 2 custom extractors:
- Customer Extractor
- SOWEffectiveDate Extractor
Go thru your positive example files and select the value within the document that you want to populate the content type column. I hit Save for each file to see the Label that was applied:

Walk thru your trained files to see the document content that will be associated with your extractor and populated in your document library columns.
Apply Model
This is the part we’ve been waiting for… now to apply it to document libraries across your tenant to see if the DU Model can accurately detect an SOW, assign the content type and the metadata columns.

Step 6: We’ve added some intelligence to the Statement of Work content type so let’s see if it will be automatically applied to new SOWs added to a library. You will be prompted with the familiar ‘Frequent sites’ and ‘Recent sites’ dialog when determining where you’d like to apply your DU Model. I’ll select a site that has some SOWs in the library where the Content Type is not yet associated to it, NexNovus Opportunites.

The model is now active on the library and will automatically run when new files are added. For existing files, you can select a new toolbar option, Classify and extract to schedule the classification and extraction process using the model against the file.
 I selected a few SOWs in the library (you can run the model against more than 1 document at a time) and in a few minutes the content type was automatically added to the library (it wasn’t previously) and was applied to the SOWs. The extractors also set the metadata, including the Customer name (Managed Metadata term) and the SOW effective date column. (Take note of the additional columns added to the library from SharePoint Syntex: Confidence Score, Classification Date, and Model URL)

Let’s add some Compliance!!!
Now that we’ve tested our model, let’s look at how we can associate a Retention Label to it so all Statement of Work content can be retained as per my retention requirements.
If you click the gear icon while in your model, a fly-out pane will have a Security and compliance section. From the dropdown, I’ll associate the Statement of Work retention label to the model…
I’ve previously created and published the Statement of Work retention label to all SharePoint sites.
 I’ll re-apply the model to the document library and rerun the Classify and extract process on the documents. As you can see, not only has the custom content type and its metadata been applied, but also the retention label. Sweet.

That was a whirlwind trip thru SharePoint Syntex. Lots yet to learn, but I’m extremely impressed with how quickly I was able to learn the process and get a Document Understanding model built, trained, tested, and deployed to a library in my tenant. I’m looking forward to blogging and speaking about this capability and working with some of my larger customers to intelligently apply governance and compliance at scale across their tenants using this new capability.
Thanks for reading.
-JCK
Credit: Photo by bongkarn thanyakij from Pexels
Hi Joanne,
Thank you for sharing this. I have applied retention with the Syntex model without any issue, but dont know how to apply Sensitivity Labels.
Microsoft has mentioned SharePoint Syntex integrates with Microsoft 365 compliance features like:
– Retention labels that define records policy based on document age or external events.
– Sensitivity labels that set DLP, encryption, sharing, and conditional access policies.
Do you know how to integrate Sensitive labels with Syntex.
Thanks.
Hi Vidana, they haven’t released the sensitivity label integration yet. It’s coming I believe by the end of the calendar year. You will see it on the same fly out as the retention label.
-JCK
Thanks Joanne. I think Syntex will replace trainable classifer as we can get more befinits with Syntex compaired to trainable classifer.
Great walkthrough, thanks for putting that together. I’m still getting my head around all the possibilities this functionality will bring!
Hi Joanne,
How did you get the customer name , I m getting mismatch I have used phrase list as follows.
Agreement (“the Agreement”) between
Agreement between
Parties:
Company Name
Customer name
Thanks.
Hi, Vidana,
I am Mingquan, I am engineer manager who worked for sharepoint syntex, I understand the chanllenge here, it is because the Customer Name is always after Company Name, and Company Name is different , and hard to get the phrase out. You can try to use a phrase of “Parties:”, and another phrase of what is after the customer name. , then add a proximity feature like Parties 2- 10 token After Phrase
Thank you for your response Mingquan!
in fact, when I looked at the sample,
It seems the customer name precedes “Services performed by”
You can try to have a single phrase of “Services performed by”, it might work without get to the proximity .
This is machine teaching, treat the machine as a student, if one teach does not work, try the other one.
the phrase after the extracted text is as good as the phrase before it.
Thanks @MINGQUAN XUE , somehow I have managed to get 86% accuracy . I ll to improve the accuracy with your tips.
One additional question when I try to create a new extraction I m getting the error called “Empty Model Path Error”, do you know why is that. I m using pre-defined site column.
Thanks.
I have started with Sharepoint Syntex for our oganization and I am stumped on one simple thing…maybe you’ve come across the answer. Simply, we are interested in using this to apply to scanned paper documents – of which someone might scan 20 of the same document in one .pdf.
So instead of 20 separate files being uploaded to and applying my model, ideally, I’d want to know if it can somehow recognize each of the 20 documents in 1 file as separate…it doesn’t seem so.
Hi Joanne, can the Syntex approach you’ve outlined above be combined with auto-apply policies using KQL to leverage columns such as confidence score greater than 95% and content types is an SOW then apply the SOW retention label? Thanks.
Hi Tim,
It would depend if the confidence score was exposed as a searchable managed property – I don’t know if it is… did a quick search and I can’t see it. To challenge that approach, I would say that the application of a retention label based on confidence score is inherently built into the Syntex AI model since you can fine-tune the “explanations” you define within the model to get to a high confidence level. You can then automatically set the retention label in the model.
The metadata you extract using the Syntex model are just SharePoint columns so they will follow the same rules for auto-applying a retention label based on a KQL query if you chose not to automatically associate a retention label with the Syntex model.
Hope that made sense.
-Joanne
Is it possible to apply multiple models to one library? The use case being – I have imported a set of documents of unknown types to a library and want to apply the correct doc type meta data value. e.g. policy or legal etc…
Absolutely! As long as you are using an unstructured document processing model, you can publish many models to the same library for the exact reason you’re giving.