

This is the first post in the Blog Post series, Microsoft 365 Fiscal Year Retention, and its purpose is to demonstrate one of the ways to implement Fiscal Year retention in Microsoft 365.
The retention requirement may read something like this… “Retain all Financial reports for 7 years past the close of the Fiscal Year they relate to and then destroy/put thru a disposition review”.
There are several ways to accomplish this other than manually applying a retention label to a document. Remember… end-users have other work to get done (and aren’t Records Managers) and we don’t want to rely on them to have to remember to apply a retention label to a document at the end of each Fiscal Year. Instead, let’s look at how this can be automated.
Each of the options in this series has differing levels of automation, control, complexity, pros, and cons. I’ll walk thru each of them in separate posts and will update the links here as they’re published:
- OPTION 1: Microsoft 365 Fiscal Year Retention | Default Folder (this post)
- OPTION 2: Microsoft 365 Fiscal Year Retention | Event-based Library Default
- OPTION 3: Microsoft 365 Fiscal Year Retention | Microsoft Syntex
- OPTION 4: Microsoft 365 Fiscal Year Retention | Event-based Auto-Apply
Advanced compliance capabilities are required for each of the options in this series for “any user benefiting from the service”. This means anyone with contribute access or above to the document library where Fiscal Year retention is being applied will require the license providing the capability.
As of May 2021, one of these is required for any of these options: Microsoft 365 E5/A5/G5, Microsoft 365 E5/A5/G5 Compliance, Microsoft 365 E5/A5/G5 Information Protection and Governance, Office 365 E5/A5. Refer to the Security & Compliance Licensing Guidance for up-to-date detail.
FACT: Automation = Advanced licensing = Less onus on the end-user
Of course, the fiscal year model can be extrapolated to other time-based retentions (monthly, quarterly, calendar year) by making minor adjustments. A table at the end of each post will show the adjustments required for other time periods.
Steps for Fiscal Year Retention | Default Folder
Step 1: Create retention label
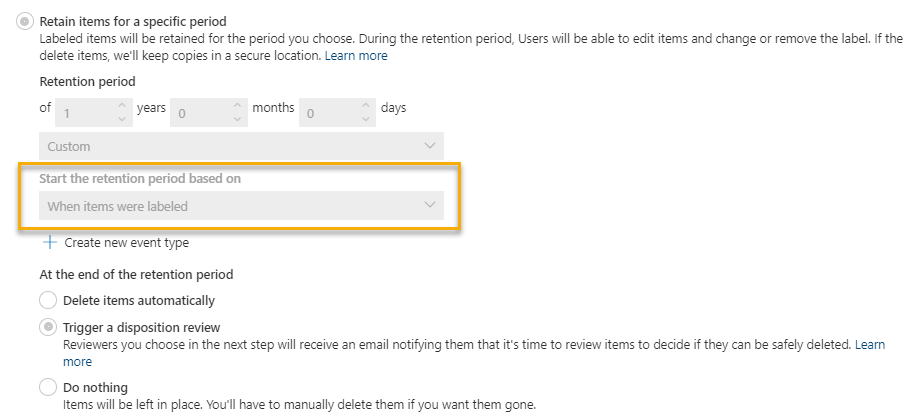
Create a retention label with your retention requirements. In this post, a retention label, Test Review Label, is created to retain for 1 year (2 days for my test) from date labeled then trigger a disposition review. (optional). By starting the retention period based on when the items are labeled, this provides you the control to start the retention clock.
The retention label is published to the SharePoint site(s) containing the content requiring the Fiscal Year retention.
Step 2: Create Fiscal Year folders
Anywhere you have content requiring retention based on FY, you need to be able to identify that content at a FY level. I’m choosing to organize my content into FY folders in a document library rather than FY metadata. Does it have to be done this way? No, however for this option it provides a significant advantage by allowing you to easily control when the FY retention label is applied to content within the FY folder. You simply apply the retention label to the FY folder and all content within inherits the retention label. (This leverages the default retention label capability which requires an advanced compliance license).
If you’d rather use Fiscal Year metadata to drive retention, check out the other options in this series.
I’d recommend creating the FY folders in advance. You can do this either manually or automatically at the end of each FY. I’ve automated this process using Power Automate for Finance teams and have previously blogged about this here: A Case for Controlled Folders using Microsoft Flow (with Retention!)
Here’s a SharePoint site, Blog Test Site 1, with a Financial Reports document library with the FY folders created within it:
 Note: an alternative is to apply the Fiscal Year Retention label to each document either manually or with a Power Automate flow AT THE END OF THE FISCAL YEAR. Although possible, this is not practical for most organizations; however, this technique would not require an advanced license since the retention label would be manually applied to each document.
Step 3: Apply the Retention Label
At the end of each Fiscal Year, the retention label could be applied to the Fiscal Year folder using 1 of 2 methods:
- Manual method: set up an annual reminder for an administrator to apply the label to the folder. Due to the frequency of the reminder (once per FY), this may be a reasonable, albeit not perfect, approach. This method requires some governance around the process.
- Automated method (PREFERRED): automatically apply to the FY folder thru a Power Automate Flow. This guarantees it will happen in an automated way and does not rely on human intervention.
Once the retention label is applied to the folder, it’s automatically propagated to all content within, including subfolders and their documents if there were any, and retention begins starting from the labeled date.


If you had a disposition review configured for your label, disposition reviewers would receive an email notification with a link to the list of records at the end of the retention period. In this example, the documents within the FY folder are now awaiting my disposition. Alternatively, they can be automatically deleted… a choice dictated by your regulatory and business requirements.

Pros to this option:
- Relatively simple to setup
- Throughout the fiscal year, end-users can collaborate as they normally would while working with the current FY content (can be a pro and a con).
- Because you’re controlling when the retention label gets applied, you’re controlling when the retention clock starts ticking… in this case, at the end of the Fiscal Year
Cons to this option:
- Prior to the retention label being applied, end-users can easily delete content within the FY folder without having to first remove the retention label (can be a pro and a con), however this action is audited and the content follows normal recycle bin processing.
- Since this options relies on the default retention capability for a folder, it requires a controlled folder structure for FY. I’ve seen this used on Finance teams where they are typically working on content relating to a Fiscal Year and are usually organized within their document libraries in this fashion already
- Ideally requires a controlled (I.e. automated) process for applying the retention label to the FY folder although this can be done manually
Tip: in some document libraries, it may be advantageous to turn off the ability for end-users to create folders if you’re wanting to control the folder structure. This is an advanced library setting.
Extrapolate this option to other Time Periods

My gift to you for reading all the way to the end of my post is to tell you what the next one in the series will be… 😊
Check out the next post in this series where an event-based retention label is set as a library default and we use Fiscal Year metadata to help automate this at-scale!
Thanks for reading.
-JCK
Most excellent practical example. Thanks, as always.
Thanks Todd!