

This is the second post in the Blog Post series, Microsoft 365 Fiscal Year Retention, and its purpose is to demonstrate one of the ways to implement Fiscal Year retention in Microsoft 365.
The retention requirement may read something like this… “Retain all Financial reports for 7 years past the close of the Fiscal Year they relate to and then destroy/put thru a disposition review”.
There are several ways to accomplish this other than manually applying a retention label to a document. Remember… end-users have other work to get done (and aren’t Records Managers) and we don’t want to rely on them to have to remember to apply a retention label to a document at the end of each Fiscal Year. Instead, let’s look at how this can be automated.
Each of the options in this series has differing levels of automation, control, complexity, pros, and cons. I’ll walk thru each of them in separate posts and will update the links here as they’re published:
- OPTION 1: Microsoft 365 Fiscal Year Retention | Default Folder
- OPTION 2: Microsoft 365 Fiscal Year Retention | Event-based Library Default (this post)
- OPTION 3: Microsoft 365 Fiscal Year Retention | Microsoft Syntex
- OPTION 4: Microsoft 365 Fiscal Year Retention | Event-based Auto-Apply
Advanced compliance capabilities are required for each of the options in this series for “any user benefiting from the service”. This means anyone with contribute access or above to the document library where Fiscal Year retention is being applied will require the license providing the capability.
As of May 2021, one of these is required for any of these options: Microsoft 365 E5/A5/G5, Microsoft 365 E5/A5/G5 Compliance, Microsoft 365 E5/A5/G5 Information Protection and Governance, Office 365 E5/A5. Refer to the Security & Compliance Licensing Guidance for up-to-date detail.
FACT: Automation = Advanced licensing = Less onus on the end-user
Steps for Fiscal Year Retention | Event-based Library Default
This option is comprised of 4 key components:
- An event-based retention label
- A tenant-level Fiscal Year term set
- A managed metadata Fiscal Year custom column
- An event trigger at the end of each Fiscal Year
You may be thinking… why not use the built-in Compliance Asset Id? Although it is certainly possible to use the Compliance Asset Id for event-based retention, I prefer to use a custom column to provide more rigor and control over the values entered into the column. For this post, I’m using a custom managed metadata column for Fiscal Year instead.
The “heavy lift” for this configuration is the initial setup. On subsequent fiscal years, you only need to ensure the fiscal year is being set on content across your tenant, the retention label assigned, and the fiscal year end event is triggered.
Let’s dig in…
Step 1 | Create Term Set for Fiscal Year
By using a tenant-wide managed term set to define your Fiscal Years, it provides the flexibility to use the term set in columns across all SharePoint sites in your tenant in a consistent way. This is particularly important if you have Fiscal Year content spread across numerous SharePoint sites, all requiring retention.
For anyone in the Records Management space, it’s important to understand how SharePoint managed terms, specifically tenant-level terms, can be leveraged to automate your retention schedule across SharePoint sites in a more scalable way than other metadata options.
We start by creating a tenant-wide term set for Fiscal Year in the Modern Term store.

Tip for Term Set Administration: Assign an owner to keep your term sets up to date and to update the default value as required. For the Fiscal Year term set, you may want to update the default value at the start of each fiscal year on all libraries consuming it.
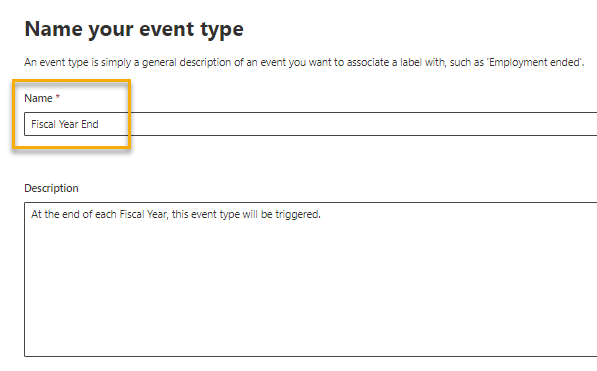
Step 2 | Create an Event Type for Fiscal Year End
Create an event type (mine is called “Fiscal Year End”) to identify the event for the end of the Fiscal Year (FY). The name should describe the event that will eventually be associated with an event-based retention label. At the end of each FY, we’ll create an instance of this event type with the exact details of the FY we want to start retention on.
Step 3 | Create Event-based Retention Label
Create a retention label with your specific retention requirements for the Fiscal Year content you want to retain. In this post, my retention label is called ‘Finance Report TEST’ and it is configured to retain for 3 days with a disposition review. I associate it to the Fiscal Year End event type from the previous step and publish it to the SharePoint site(s) where my Fiscal Year content will be stored.

In Public Preview, you can now have a multi-stage disposition review. In this FY retention example, the first stage could be a Finance team and the second stage could be the Records Management team as the image below shows. Check out this blog for more details: How to configure multi-stage disposition review

Step 4 | SharePoint Document Library and Site Column setup
For the retention engine to find the documents at the end of the Fiscal Year, the Fiscal Year must be associated to each document in any library where you want the retention to occur. Create a managed metadata site column, FiscalYear in my example, pointing to the tenant-wide term set created in step 1 and add it to the document library. To ensure it is updated on each document, do either 1 of these 2 things:
- Set the list column default for FiscalYear to be the current fiscal year. This will automatically set it to the current year for any document added to the library. This does not prevent an end-user from changing the value if required (if they entered a document for last Fiscal Year). If you choose this way, assign an administrator to set the default at the start of each Fiscal Year.
- Optionally, and what I’ve done in this post, create Fiscal Year folders in the library and set the column default value for the FiscalYear column for each Fiscal Year folder. You can precreate these folders in advance for many Fiscal Years ahead. This will automatically set the Fiscal Year column to the default value for the folder the document is placed into. This is done in the library settings under Column Default Value Settings
This allows you to set the default term for the folder. In this image, I’m setting the default value for the FiscalYear column in the FY 2019-20 folder to be the 2019-20 term:

Once you have all folders’ default value set with the correct term, you will see a green gear icon on each folder icon:
Whichever way you choose to default the Fiscal Year, as long as the document’s Fiscal Year column has been filled with a value on each document, the retention engine has something to work with!
Last, but certainly not least, set the default retention label on the library to be the event-based retention label, Finance Report TEST. Know that once you do this, no document can be deleted unless the retention label is first removed from the document.

Step 5 | Search Schema Preparation
Because event-based retention is search-based, we need to do some pre-work in the SharePoint Search schema before triggering the first Fiscal Year event. This setup only needs to be done once and it can then be used in all future events and anywhere you want to use the Fiscal Year value across the entire tenant.
To start, we need a crawled property generated for the FiscalYear column. To do this, we add some sample content into the Fiscal Year folders in the library and wait for the content to be crawled by the search process.
Once the crawled property is generated, ows_taxId_FiscalYear in my case, I map it to one of the pre-configured RefinableString managed properties in the search schema, RefinableString108 in my example:
You MUST use a pre-configured Refinable managed property. A custom managed property will not work as the condition on an event trigger. Trust me, I’ve tested this!
Tip: Since I’m working in the tenant-level search schema, the managed property I’ve configured can be leveraged in other scenarios as well. For instance… use it in a Highlighted Content Web Part on a modern SharePoint page to show “Board Member bio pages filtered by current Fiscal Year”.
Step 6 | Validate the Search Query
It’s always a good idea to test out your search query to verify the results before creating your event. In this case, I want to simulate the Fiscal Year End event for FY 2020-21 where I will be providing a query to determine all content to start retention on.
I’ll use the managed property in my query… RefinableString108:’2020-21′ and confirm there are 6 document results to be included in the retention event.
Step 7 | Create Retention Event
At Fiscal Year end, after all documents worked on throughout the year have been tagged with the Fiscal Year they relate to, we need to trigger the event. We specifically want to start retention on anything with the Finance Report TEST retention label applied and the Fiscal Year 2020-21. This can be done several ways:
- Manually thru the UI, which may be a feasible option since this is only an annual event. This is what I’ve done for this post.
- Automatically using:
- PowerShell: New-ComplianceRetentionEvent (ExchangePowerShell)
- REST API: Automate events by using a REST API (will be deprecated soon)
- [Preview] Microsoft Graph API for records management (recommended)
After you provide a unique event name, such as Financial documents for FY 2020-21, you must identify the settings for the event:
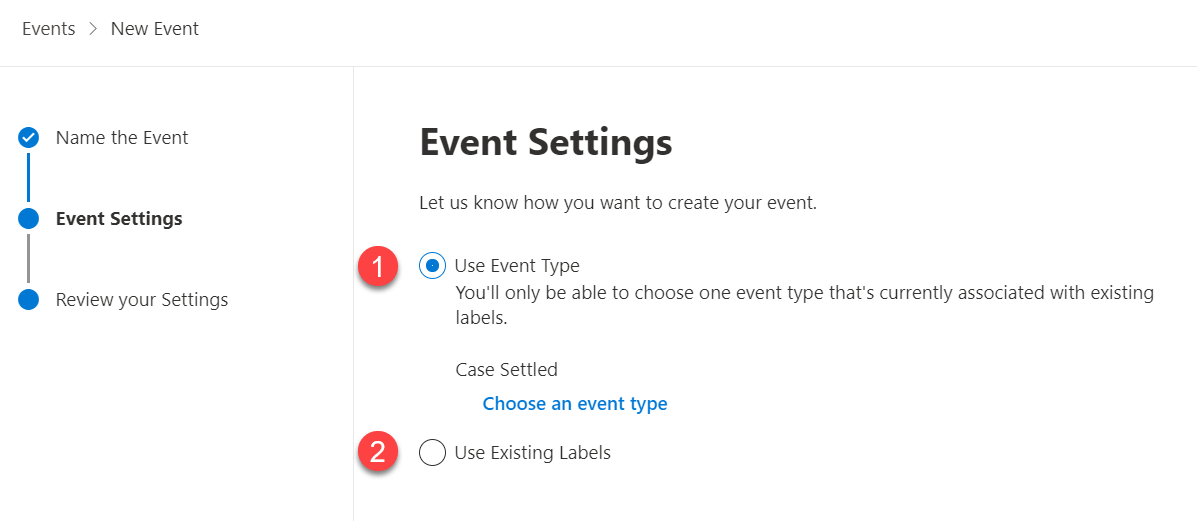
If you select Use Event Type, it will process all content tagged with all retention labels associated to that event type. A use-case for this is if you have content with different retention periods, but all starting their retention at the end of the Fiscal Year.
If you select Use Existing Labels, you can select a myriad of event-based retention labels, each associated to potentially different event types. I’m still trying to come up with a good use-case for this scenario… if you have one, let me know! 🙂
Immediately after I create the event for FY 2020-21 by supplying the event-based retention label, the search query to use, and the date to start retention, the counts are 0:

Several days later (when the back-end process has ran against the content), the counts are updated:

A new column, Label Event Date, is automatically added to the library once the back-end event process runs and has identified the content relating to the event. The date/time shown will match what was entered for the event trigger.
Important: if content is added AFTER the event date for the retention label and same Fiscal Year, 2020-21 in our case, the items will NOT be processed. You must trigger another event with the same conditions to pick up the new items.

Step 8 | Perform Disposition Review
Because I also had a disposition review configured for this retention label, I received an email when the disposition review period was reached:

… and when I click Go there now… I see the 6 records waiting my review:

That’s it! The first year is the heavy lift on the setup; however, on subsequent years, this is all you will need to do:
- ensure you’ve set up the new Fiscal Year term in the tenant-level term set
- ensure the default value for the current FY is set on libraries across your tenant where FY content will be stored. Although not required, it will make it easier on end-users working with the content if the value is defaulted for them
- trigger the event at the end of the FY (automate if you can)
Pros
- Scalable. As long as a Fiscal Year metadata column is populated on content and it has the event-based retention label assigned to it, the event trigger will start the retention on the item when you trigger the event.
- Can set the default value on libraries to alleviate the end-user from having to do it [Optional]
Cons
- Requires SharePoint search knowledge
- Requires back-end configuration in tenant-level term store
- You cannot add new content with the FY and the retention label AFTER the event has been triggered. It will not get picked up if you do
- Someone has to remember to manually trigger the event OR you have to automate the process (which incurs technical debt)
Please join me in the next post in this series where I use a SharePoint Syntex AI Model to automate the metadata extraction for Fiscal Year and automatically set the event-based retention label.
Thanks for reading.
-JCK
2 comments